Let's Talk Charts!
Charts are an excellent way to communicate patterns in knitting and help a designer distill pages of densely written text into one picture. With a few simple rules, charts are easy to understand, give visual clues as to what your finished piece will look like, and can be understood across language barriers.
A chart for knitting is typically set into a grid pattern comprised of squares that are populated by symbols. Each of these symbols indicates what type of treatment to give each stitch. The chart is worked in horizontal lines with each line representing a row/round (or partial row/round) of knitting. Before you even begin knitting, a visual examination of the chart can tell you whether you are knitting flat or in the round, starting on a RS or WS row, and show a preview of your pattern before you even knit it.
Rows or rounds: Where are your numbers?
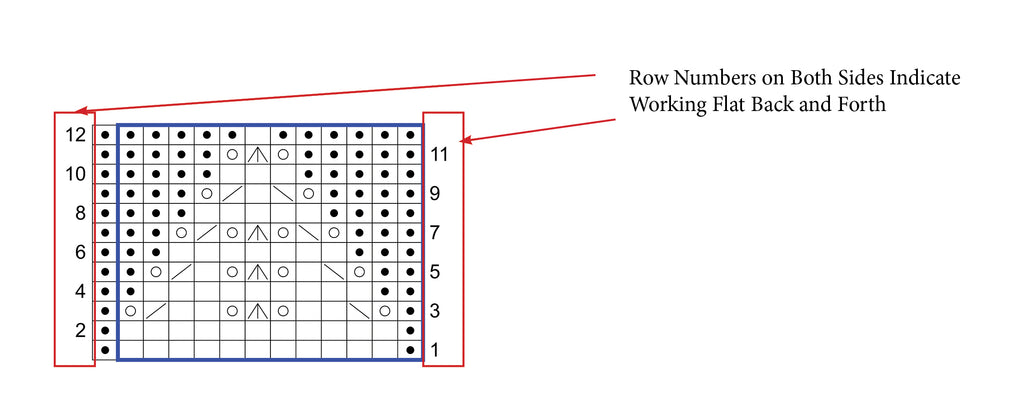
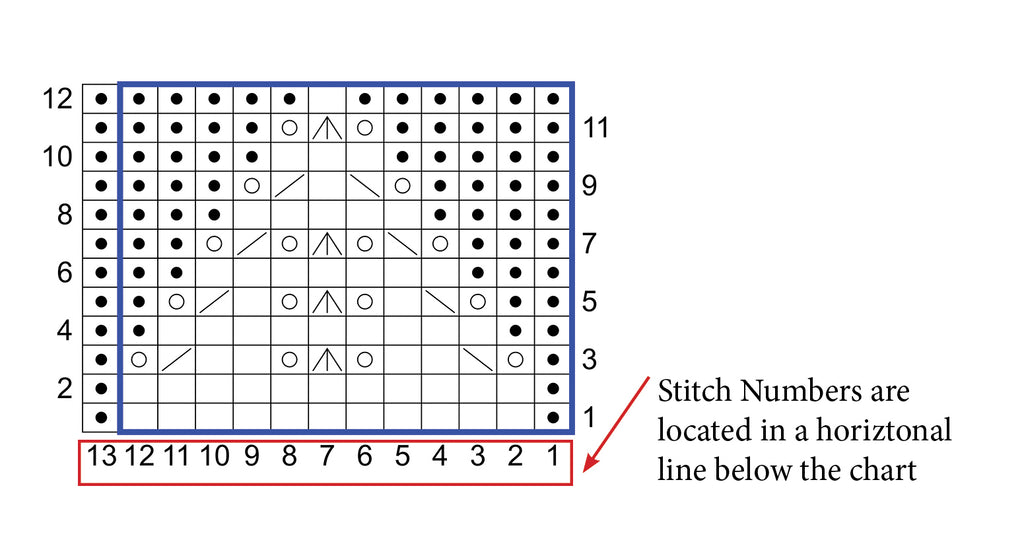
First look for row/round numbers. These are the numbers arranged vertically on either one or both sides of the chart. If the numbers alternate sides with all odd numbers on one side and all even numbers on the other side the chart should be worked back and forth in rows.
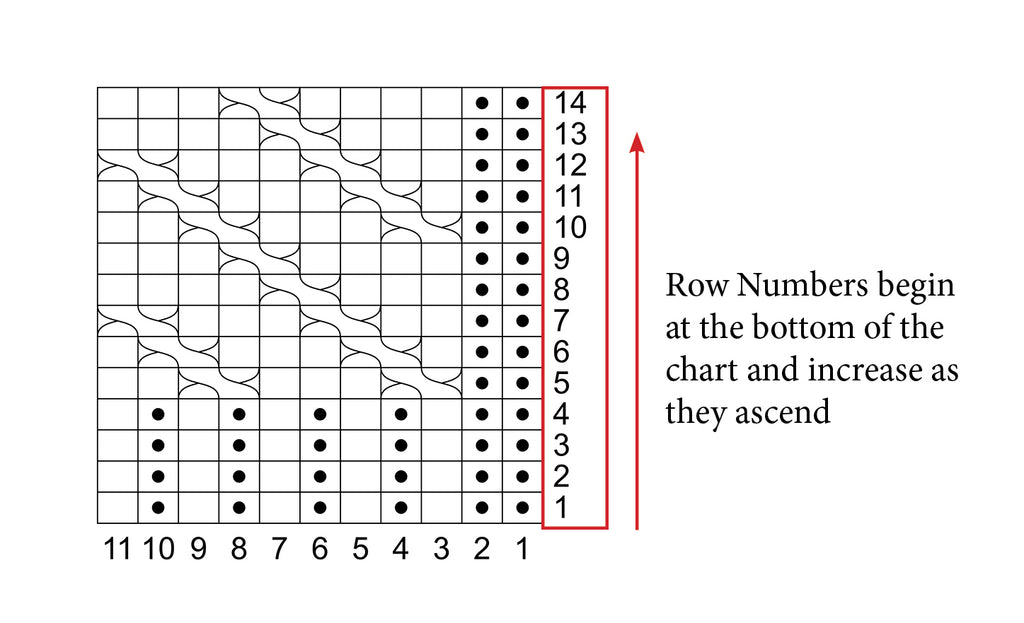
If the chart has all the numbers on one side (normally the right-hand side) of the chart it should be worked in the round.

Why are the row numbers arranged this way?
When we knit flat in rows, we work from right to left across the stitches, and then turn the work around to complete stitches on the wrong-side row. Charts for working back and forth are read in the same manner that we knit: Work from right to left on the right-side rows and left to right on the wrong-side rows.
When we knit in the round, we are always working from right to left across the stitches. The work is never turned so all the rounds are worked on the right side. A chart that is worked in the round is always worked from right to left, and every round is started from the right-hand side; therefore, every number will be on the right-hand side of the chart.
Chart row/round numbers are always arranged with the smallest number at the bottom with the numbers increasing as they ascend the side(s) of the chart. This means that the first row of the chart is always the bottom line of the grid and you will work subsequent rows from bottom to top. Knitting charts are worked from the bottom up because knitting is essentially worked from the bottom up as we are adding rows of stitches onto the top of the already created rows of stitches.
TIP: Try using a ruler, piece of paper, magnetized chart board or removable highlighter tape to cover each row of the chart as you work it. This keeps your knitting on the right row and also makes the chart into smaller steps to conquer. You will complete many rows before you know it!
What about those numbers on the bottom?
Some charts have a horizontal line of numbers located below the chart to indicate the number of stitches that are present across the chart grid. But most often the numbers given below the chart represent a small section of stitches called a repeat. If the number of stitches at the bottom of the chart matches the number you have cast on, you will be working the chart across all the stitches. If the number of stitches is less than the cast-on stitches, you will either be working other kinds of stitches around the chart or multiple repeats of the chart.
When knitting flat, which are the right-side and wrong-side rows?
Charts that have numbers on both sides always have the right-side row number on the right-hand side of the chart and the wrong-side row number on the left-hand side of the chart. Odd or even numbers do not indicate whether the row is a right-side or wrong-side row, so make sure to check what side of the chart the number is located on. This can make a huge difference when reading the stitch key as you will want to follow the right-side and wrong-side directions for each stitch accurately.
Why is the chart set into a grid pattern?
Each square of the chart indicates a stitch in the knitting. As you work across the knitting you can count on each stitch being represented on the chart in the manner that it will be treated. Since the basis of knitting is yarn pulled into loops through other loops that are stacked, it makes sense to represent the knitted pieces as a grid.
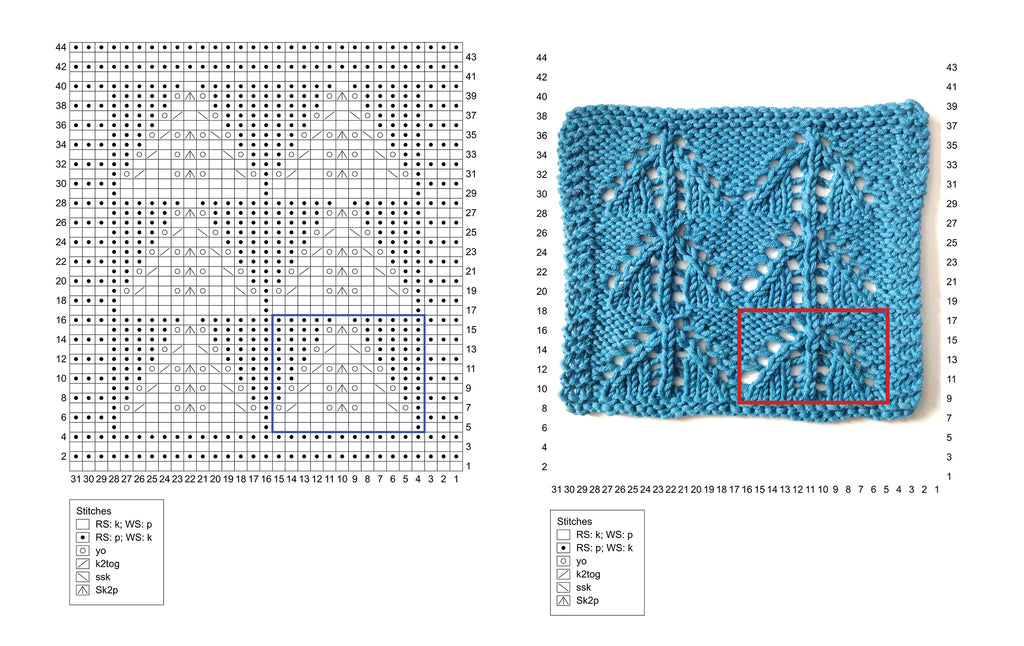
Why are there colored lines forming a box around some of the stitches?
Sometimes the entire chart is a repeat, but other times there is a repeat within a chart. When you see colored lines creating a box around stitches within the chart, you will need to repeat that section of stitches a certain number of times. The general rule is this: If there are stitches preceding the boxed stitches, work them first once, then work the boxed stitches the number of times indicated by the pattern. You can reasonably expect this to sound something like "Work chart Rows 1-12, repeating marked section five times total," which would mean you should make sure to work the boxed area a total of five times. Then work any stitches after the boxed area once, typically stitches within these kinds of charts have a separate repeat because the charted pattern needs special treatment to make the repeat work properly.
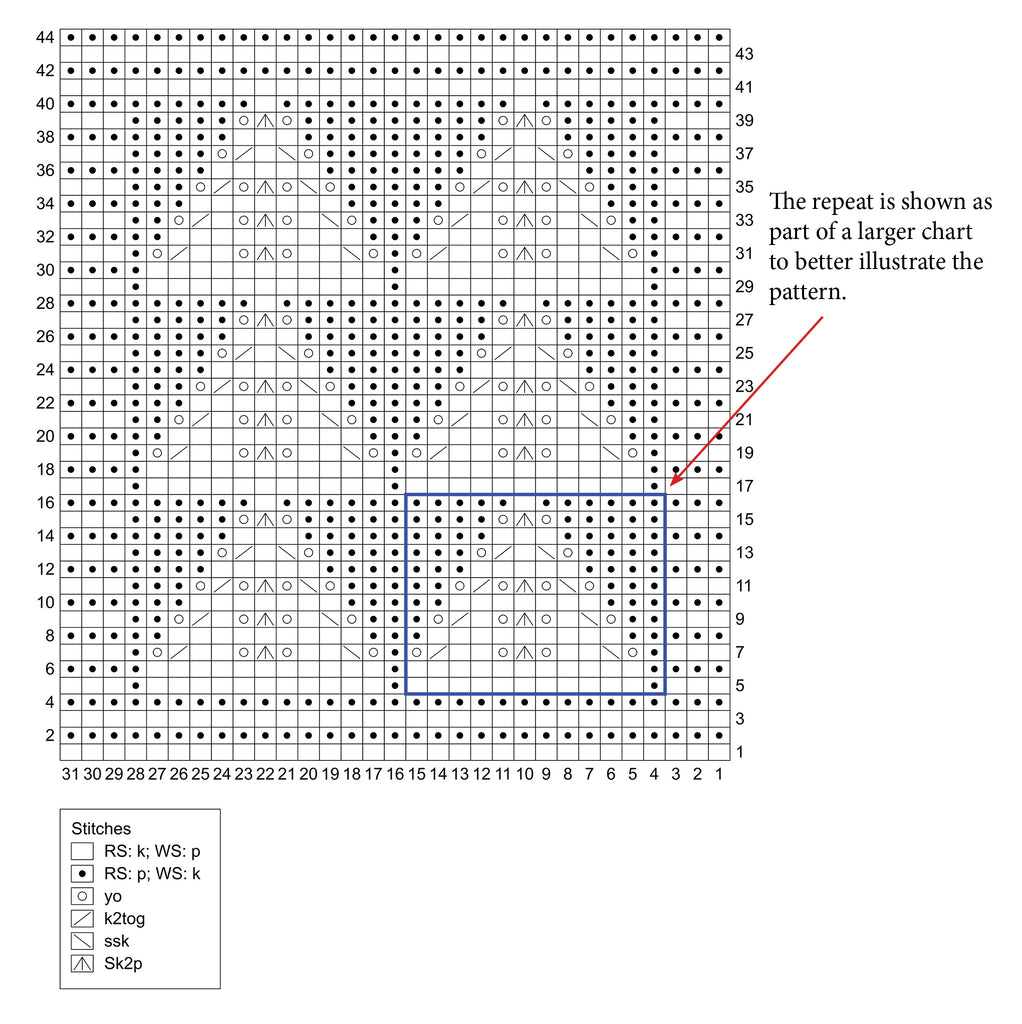
TIP: Sometimes charted patterns in stitch dictionaries show you a larger chart with a smaller boxed section in the corner. This indicates what the overall charted pattern will look like with the actual smaller repeat in the box.
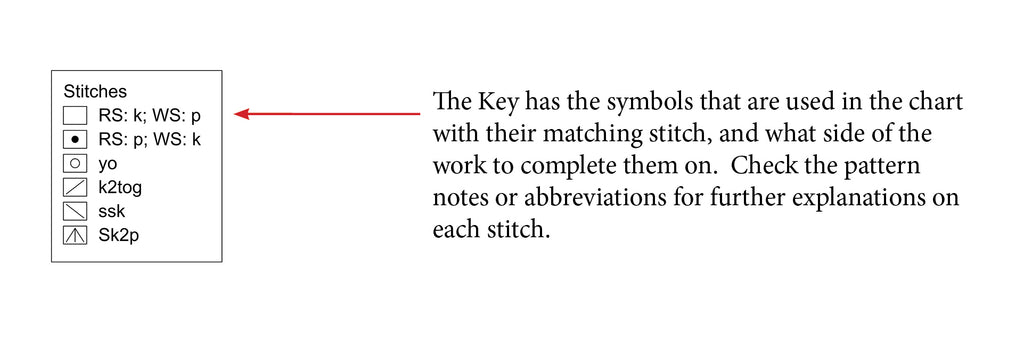
What is this smaller box with symbols in it, or a list of symbols?
For every chart there needs to be a key. This is usually a small box or section of text that defines the symbols needed to work the chart. This is when knowing right side versus wrong side is really important as most stitches are worked with a right-side and wrong-side row to create the finished look on the right side of the fabric. Some stitches, like garter stitch, are worked with the same treatment on both sides, but even the humble stockinette stitch needs to be knit on the right side and purled on the wrong side.
The key will have a symbol which is followed by a definition, if the definition indicates right side (RS) or wrong side (WS) you know that symbol has different treatments on each side respectively. If there are no side indications, then you will work that symbol as written regardless of the side that is worked on. Note that charts worked in the round will not have right side or wrong side indicated since you are always working on the right side of the piece.
TIP: Some knitters may find it helpful to color-code their charts with highlighters. First, reference the symbol on the key, and then color all representations of that symbol on the chart the same color. You can further delineate by using a different color for the right-side row uses of that stitch, and the wrong-side row uses of that stitch.
General rules for how stitches are depicted on the chart.
A single worked stitch that does not increase or decrease is represented on one square.
Charts worked back and forth can have different instructions for the symbol used on the right side and the wrong side, but they are still represented as the same symbol on the chart.
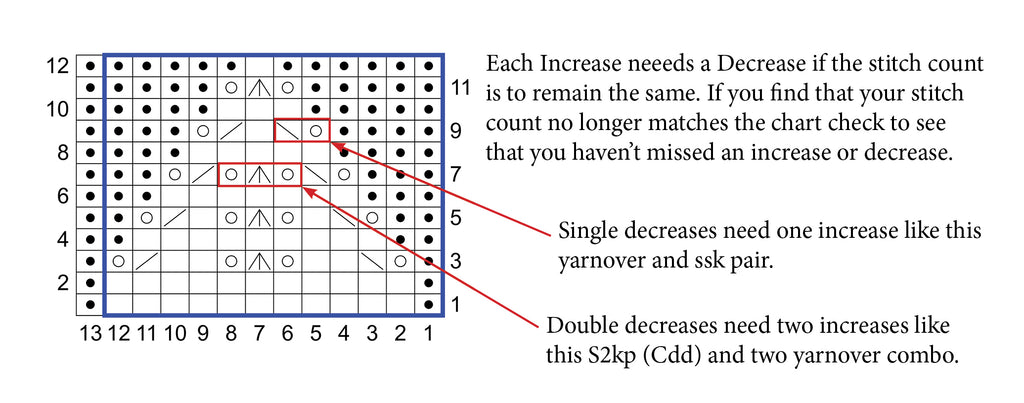
A decrease stitch on a chart has to be paired with a matching number of increase stitches if the chart edges are to remain even
Decreases are represented on the number of squares that they become after working the decrease, not the number of stitches that they use for the decrease.

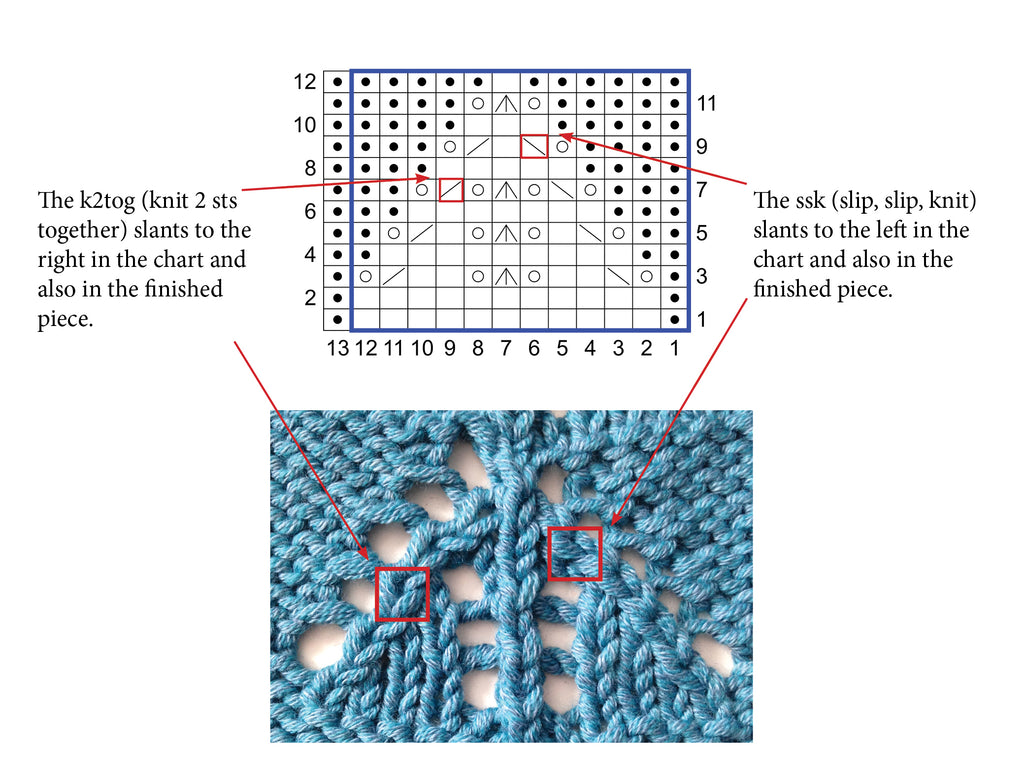
Decreases are represented as symbols that slant in the direction that the finished decrease will slant. This gives you a visual clue as to how that stitch pattern will actually look when it is knit.
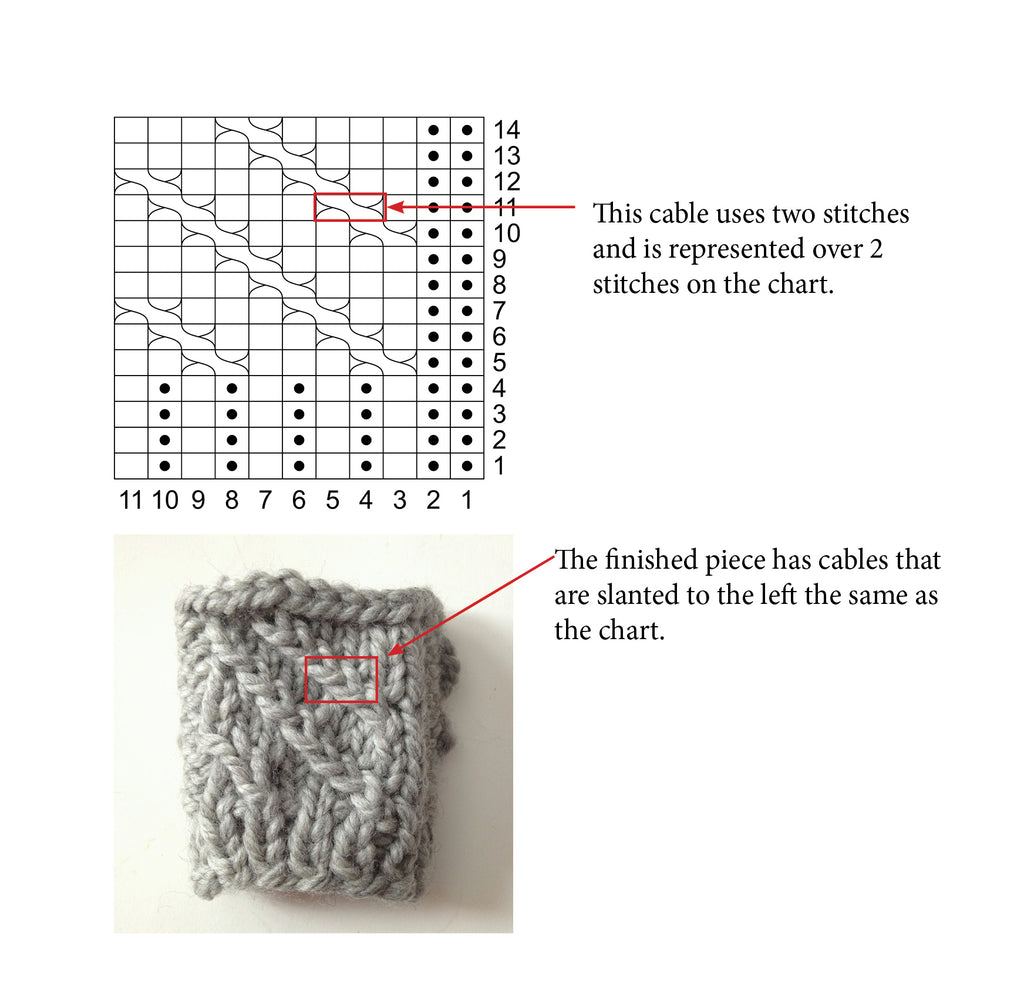
Cables are represented over all the stitches that are used for the cable. Like decreases, they also slant on the chart in the same direction as the finished piece.
TIP: Some charts have a gray or "no stitch" square. This literally is not a stitch since it does not represent a physical stitch in the knitting; it's just a placeholder in the chart for a stitch that has yet to be created. Skip over this square when you are reading the chart, but don't skip over anything in the knitting.
I hope you enjoyed this tutorial for How to Read Knitting Charts, if you have any further questions please leave them for me in the comments and I will make sure to answer them!
Happy Knitting,
Meghan
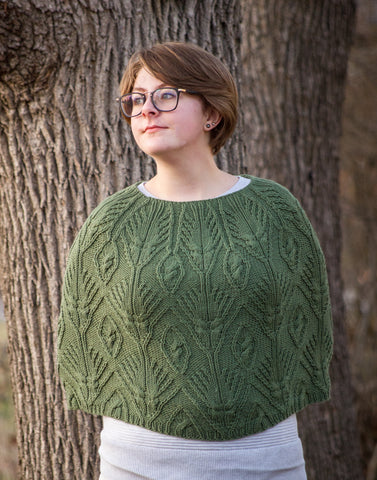
Want to practice your chart reading skills? Check out the Genesee Mountain Poncho Pattern, this worsted weight poncho is worked in the round from the bottom up and has charted and written patterning.

Nan Palmer
So comprehensive! I think you got a lot into this post. Clear, concise, sensible. Brava, Meghan! xo
Meghan Jones
Hi Suzanne! Feel free to direct knitters in your class to the post, or share it on screen, thanks! xo Meghan
Suzanne warner
Thank you so much! I’m teaching a beginners class and this will come in handy if I have your permission to use it. Thanks again💟💟💟💟
Judy
This is great! Thank you for putting it up, Barb!
Cee
this is very helpful, I will print it out and put it my knitting info binder