Stockinette stitch on the WS is a serious of bumps made by the small top of each loop hooking around the base of the next loop. In diagram 1.3 you can see the basic structure of the WS of stockinette stitch.
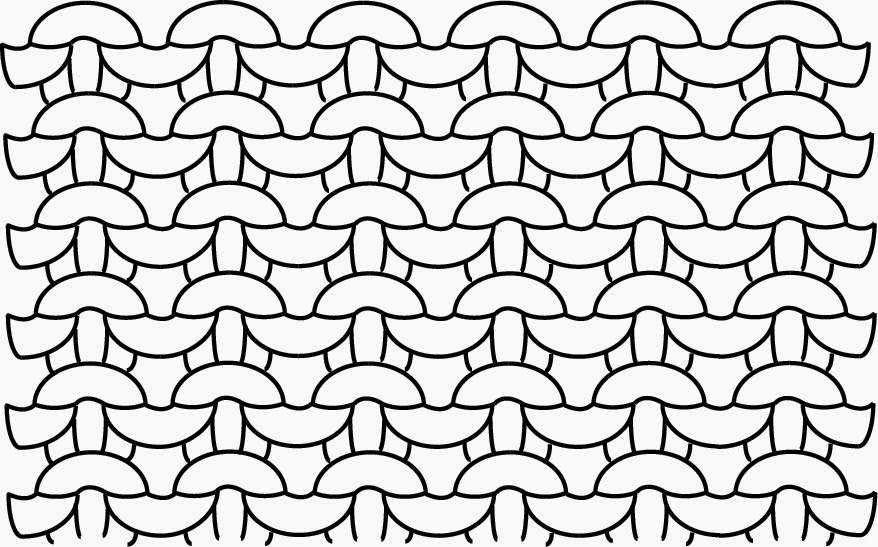
This Diagram depicts the different rows of stitches and how they look on the WS of Stockinette. Each row on the WS is actually the top of the bottom loop and the bottom of the top loop together that make a bumpy line (shown in green). These lines can be counted as one row when looking at the WS of Stockinette stitch.

Duplicate Stitch cannot be worked into the WS of St st although it does make a nice background for many other kinds of embroidery. Kitchener’s stitch isn’t modified to work on this side either as you would simply turn the work to the RS and work Kitchener’s without modification.
Kitchener’s stitch is a staple knitting technique and is used to join two rows of live stitches together seamlessly. Most patterns call for Kitchener’s stitch to be worked on live stitches that are still on knitting needles, for example closing the toe of a top down sock.
Kitchener’s Stitch on two needles
Begin with two needles that have an equal number of live Stockinette Stitches. Arrange these needles parallel to each other with tips at the same end and WS of Stockinette fabric facing together. Thread live end of yarn into tapestry needle:
Step 1: insert tapestry needle pwise through 1st stitch on front needle, leave on.
Step 2: insert tapestry needle kwise through 1st stitch on back needle, leave on.
Step 3: insert tapestry needle kwise through 1st stitch on front needle, slip stitch off needle, insert pwise through next stitch on front needle, leave on.
Step 4: insert tapestry needle pwise through 1st stitch on back needle, slpi stitch off needle, insert kwise through next stitch on back needle, leave on.
Rep Steps 3-4 for kitchener’s stitch.
And easy way to remember the pattern for Steps 3-4 is knit off purl, purl off knit.
Steps 1-2 are actually only half steps, they are the second action in steps 3 and 4 and set up the kitchener’s stitch, if you miss these your right edge will look wrong.
Like this post? Want to see more Technique Tuesday posts? Check out our Technique Tuesday Pinterest Board for all posts in this series.
Like this post? Want to see more Technique Tuesday posts? Check out our Technique Tuesday Pinterest Board for all posts in this series.